
Could a single humid Nashville afternoon ruin your entire flooring investment before the first plank is even nailed down? It's a valid concern for any homeowner who has spent weeks selecting the perfect grain only to worry about the dust, mess, and unpredictable Tennessee climate. You want a home that feels like a sanctuary, not a construction zone; you certainly don't want to see your beautiful new boards buckling six months after the crew leaves because of a rushed professional hardwood floor installation process.
We understand that the path to a stunning home involves more than just picking a color. It requires a deep respect for the science of wood and the local environment. By mastering the technical steps of a high-standard installation, you can ensure your Nashville home's new floors last a lifetime while adding significant market value. We're here to guide you through that transformation with the precision of a master craftsman and the warm hospitality of a local partner.
In this guide, we'll break down the essential NWFA standards for moisture management and explain how the 2024 International Residential Code affects your project. We will also show you how meticulous subfloor preparation creates a foundation for a flawless finish. You'll gain the confidence to oversee your renovation with ease, knowing exactly what it takes to achieve a quiet, durable, and breathtaking result.
Key Takeaways
- Navigate Nashville’s humidity with a non-negotiable acclimation window that ensures your planks stay stable for years to come.
- Identify the specific subfloor engineering needed for your home’s architecture, whether you are working with concrete slabs or traditional plywood.
- Master the technical phases of a professional hardwood floor installation process, from establishing a square starting line to the art of racking for natural grain distribution.
- Learn how modern dust containment and a refined sanding sequence can transform your living space without compromising your home’s air quality.
- Gain the expert insight required to conduct a final walkthrough that guarantees your investment meets the highest industry standards for durability and beauty.
The Critical First Step: Acclimation and Site Preparation
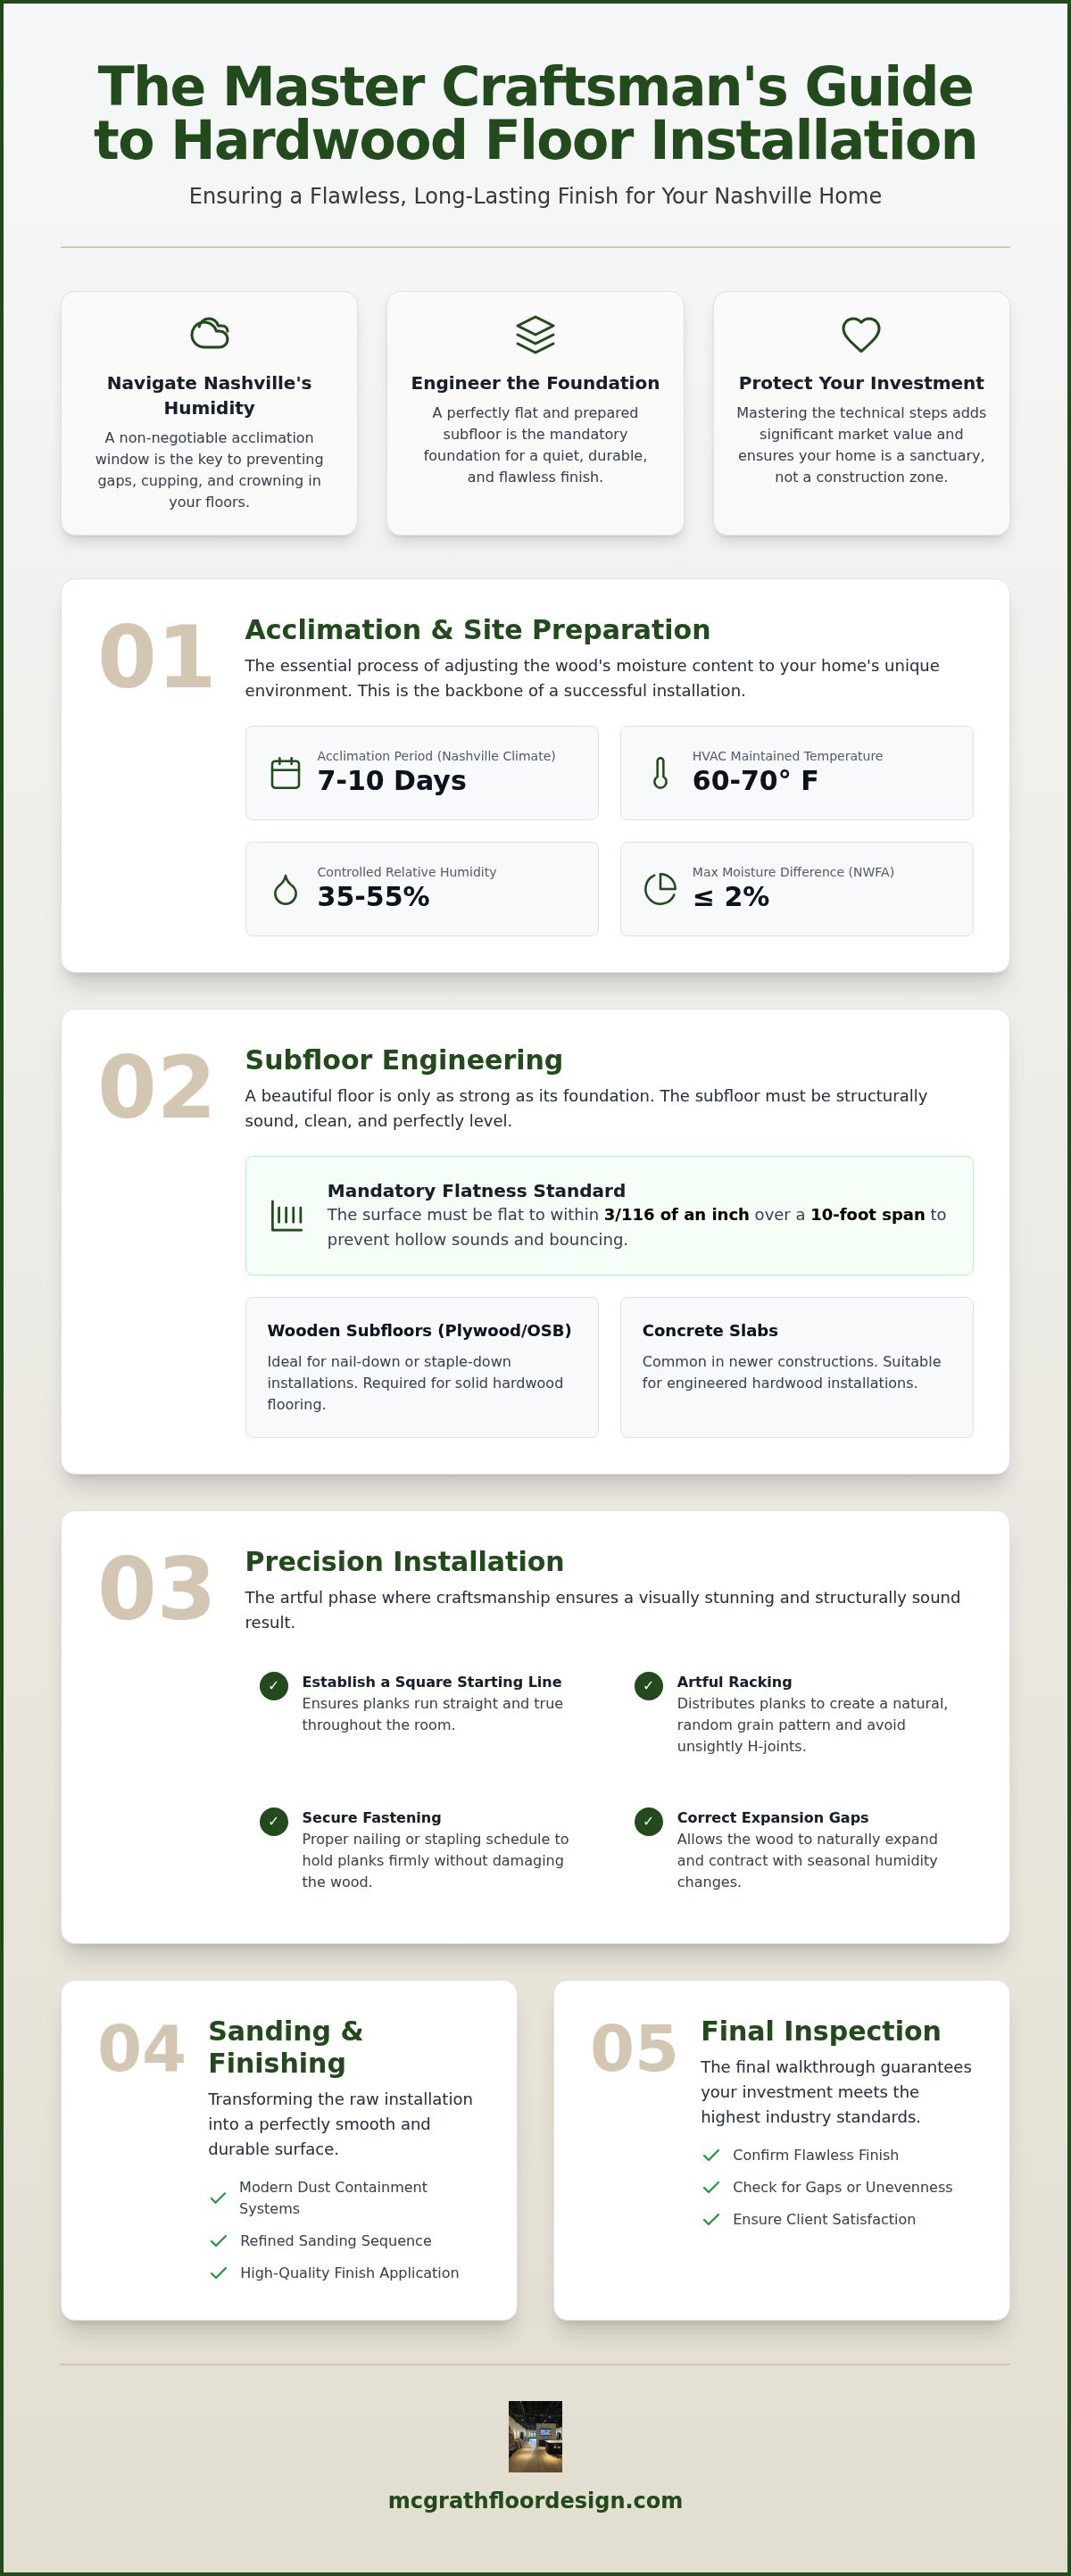
Acclimation is the essential process of adjusting the moisture content of your wood to the specific environment of your home. In Middle Tennessee, where humidity can swing wildly between seasons, this stage is the backbone of a successful professional hardwood floor installation process. Skipping or rushing this step often leads to gaps, cupping, or crowning later in the floor's life. While some regions might get by with a few days, Nashville's unique climate makes a 7-to-10-day acclimation period non-negotiable for most species.
This phase isn't just about letting boxes sit in a room. It involves a careful dance of environmental control and scientific measurement. We focus on reaching the equilibrium moisture content (EMC), the point where the wood neither gains nor loses moisture. By preparing the space correctly, including the removal of base shoe molding and checking door clearances, we set the stage for a floor that remains stable for decades.
Moisture Testing and Environmental Controls
We don't guess when it comes to moisture; we measure. Using professional pin or pinless moisture meters, we verify the moisture levels of both the subfloor and the new planks. The goal is a narrow moisture gap. According to NWFA standards, the difference in moisture content between a wood subfloor and the flooring should generally be no more than 2%. During this time, your HVAC must remain active. Maintaining a consistent temperature between 60-70°F and humidity between 35-55% is vital for the life of the floor. This stability is one reason why white oak hardwood flooring is a local favorite. Its cellular structure handles these environmental shifts with remarkable grace. Understanding different Wood flooring types and methods helps homeowners realize why these strict environmental controls are necessary for long-term durability.
Demolition and Surface Readiness
Before the new wood arrives, the workspace must be meticulously prepared. This begins with removing existing carpet, tile, or old laminate to reveal the original subfloor. We take this opportunity to address structural issues like persistent squeaks or loose joists. A clean, level surface is mandatory. For a professional finish, the subfloor must be flat to within 3/16 of an inch over a 10-foot span. This attention to detail ensures that when we evaluate engineered wood flooring vs solid hardwood flooring, both options perform at their peak. We also ensure all debris is cleared away, as even a small wood chip can create a noticeable bump in your finished floor.
Subfloor Engineering: Solid vs. Engineered Wood Requirements
A beautiful floor is only as good as the surface beneath it. The integrity of your investment depends entirely on the engineering of your subfloor. In Middle Tennessee, we commonly encounter two primary surfaces: traditional plywood or OSB in established neighborhoods and concrete slabs in many newer constructions. Understanding how these surfaces interact with your chosen material is a vital part of the professional hardwood floor installation process.
Before a single plank is laid, we verify that the subfloor meets strict leveling requirements. Industry standards demand a flatness of 3/16 inch over a 10-foot span. If the surface is uneven, we use specialized leveling compounds or meticulous sanding techniques to create a smooth foundation. This precision prevents the "hollow" sounds or bouncing sensations that plague subpar installations. When comparing engineered wood flooring vs solid hardwood flooring, your home's foundation often dictates which material will perform best over time.
Installing Solid Hardwood
Solid hardwood remains a beloved choice for historic Franklin estates because of its incredible longevity and ability to be refinished multiple times. However, it requires a wooden subfloor for a secure nail-down or staple-down attachment. Installing solid wood directly over concrete is a recipe for failure, as the wood cannot be properly fastened and remains highly susceptible to moisture from the slab. We always include a high-quality felt paper or silicone vapor shield between the wood layers. This barrier is your first line of defense against Nashville's ground moisture, effectively preventing the dreaded cupping and crowning that can ruin a floor's profile.
Installing Engineered Hardwood
For the concrete slabs frequently found in Brentwood developments, engineered hardwood offers superior versatility. It can be glued directly to concrete or installed as a floating floor, making it an excellent solution for modern architecture. Its multi-layer core is specifically designed to resist the expansion and contraction caused by our local humidity cycles better than solid planks. If you have a high-traffic household, a glue-down application provides a solid, permanent feel underfoot that mimics the sound of traditional solid wood. If you are unsure which material fits your home's foundation, we invite you to speak with our design consultants to ensure your subfloor is properly prepared for your specific lifestyle.
Precision Installation: Layout, Fastening, and Expansion Gaps
The moment of installation is where craftsmanship meets mathematics. We don't simply begin at the longest wall and hope for the best; we establish a primary "starting line" by measuring the entire footprint of the project. This ensures the floor runs perfectly square to the home's architecture. Without this calculation, you might notice planks tapering off at an angle when they reach a hallway or far wall. This level of planning is a hallmark of a professional hardwood floor installation process, turning raw materials into a cohesive, intentional surface.
Racking the floor is the next artistic hurdle. We lay out several rows of planks across the subfloor before any fastening begins. This allows us to distribute color variations and grain patterns evenly throughout the room. We call this "balancing the floor." It prevents clustering, where too many dark or light boards end up in a single area, and ensures the natural beauty of the wood feels varied and organic. During this stage, we also account for the expansion gap. This precise perimeter, usually 1/2 to 3/4 of an inch, is hidden by your baseboards but remains vital. It gives the wood space to breathe and move as Nashville's humidity fluctuates throughout the year.
Layout Strategy and Aesthetics
A high-end designer look depends on avoiding common pitfalls like "H-joints" or "stair-stepping." We stagger the end-joints of adjacent rows by at least 6 inches, creating a strong, interlocking structure that is pleasing to the eye. Transitions and thresholds are handled with equal care to ensure a seamless flow between rooms. When we encounter complex features like a stone fireplace or a curved wall, we use precision scribing and custom cuts. These details ensure the floor looks like it was built into the home, not just laid on top of it.
Fastening and Adhesion Techniques
Consistency is the secret to a quiet floor that doesn't creak underfoot. We use pneumatic floor nailers to deliver uniform pressure with every cleat or staple. For solid wood, we follow a strict fastening pattern, typically placing a fastener every 6 to 8 inches along the plank and within 2 inches of every end. If we're performing a glue-down installation for engineered wood, we select high-quality, low-VOC adhesives. These provide a permanent bond while protecting your home's air quality. Every plank is pulled tight to its neighbor, ensuring the field of the floor is rock-solid while the expansion perimeter remains clear for future movement.
Master Craftsmanship: The Sanding and Finishing Sequence
The raw planks are now secured, but their true personality remains hidden beneath a rough exterior. This phase is where the technical preparation of the professional hardwood floor installation process transforms into pure artistry. It is the moment your vision finally meets reality. We approach this sequence with a meticulous eye, ensuring that every square inch of your new floor is as smooth as it is beautiful.
We recognize that many Nashville homeowners fear the invasive dust traditionally associated with wood flooring. To protect your home's air quality and your family's comfort, we utilize advanced HEPA-filtered dust containment systems. These powerful vacuums are connected directly to our sanding equipment, capturing nearly all airborne particles before they can settle on your furniture or drift into your HVAC system. This commitment to a clean workspace is a hallmark of our elite service, allowing you to enjoy the transformation without the typical construction mess.
The Sanding Process
Achieving a mirror-smooth finish requires a disciplined progression of sandpaper grits. We begin with a heavy-duty drum sander for the main field, while specialized edgers reach the perimeters and corners. We move from coarse grits, which level the wood and remove imperfections, to finer grits that polish the surface. The final step is "screening" or buffing. This fine-polishing stage removes any remaining micro-scratches, ensuring the wood is perfectly receptive to the stain or sealer. This methodical approach prevents the "swirl marks" often seen in hurried, low-quality work.
Staining and Sealing
If you desire a specific hue, we offer custom staining to create a bespoke color palette tailored to your interior design. Many of our clients visit our Franklin showroom to see these possibilities in person. Before applying the color, we often "water-pop" the wood. By lightly misting the floor with water, we open the wood grain, which allows for a deeper and more uniform stain penetration. This results in a rich, professional look that DIY methods simply cannot replicate.
Finally, we apply multiple protective coatings to safeguard your investment. You can choose between water-based polyurethanes, which offer fast dry times and low odor, or traditional oil-based finishes that provide a warm, amber glow. While water-based finishes allow for light foot traffic in about 24 hours, we guide you through the full cure times to ensure the longevity of your finish. If you are ready to see how these finishes can elevate your living space, schedule a consultation with our master craftsmen today.
Final Inspection and Protecting Your Investment
The last coat of finish has dried, and the equipment has been packed away. Now comes the most rewarding phase of the professional hardwood floor installation process: the transition from a construction site back into your home. This final stage is where meticulous attention to detail ensures your new floors aren't just beautiful today, but remain a source of pride for decades. We treat this closing phase with the same level of care as the initial acclimation, ensuring every transition and piece of trim is perfectly tailored to your space.
We begin by reinstalling your baseboards and shoe molding. These elements do more than just provide a finished look; they provide the necessary coverage for the expansion gaps we established during the layout phase. By carefully scribing and mitering these joints, we create a seamless border that anchors the room's architecture. As you consider the cost to replace hardwood floors, remember that the value of a professional install lies in these final flourishes that DIY projects often miss. A perfectly executed trim package is the difference between a floor that looks "installed" and one that looks like it has always belonged in your Nashville home.
The Final Walkthrough Checklist
We believe in absolute transparency, which is why we invite you to join us for a comprehensive final walkthrough. We want you to see the craftsmanship up close. During this inspection, we focus on several key areas to guarantee the work meets our high standards:
- Surface Consistency: We check the entire floor under various lighting conditions to ensure the finish sheen is uniform and free of puddles or dry spots.
- Structural Integrity: We verify that all transitions between rooms are rock-solid and that there are no "nail pops" or loose boards.
- Detail Work: We inspect the fit of the molding against the floor, ensuring the expansion perimeter is fully protected and hidden.
- Cleanliness: While our dust containment systems do the heavy lifting, we perform a final sweep to ensure your home is ready for furniture.
Long-Term Maintenance Strategy
Stewardship is the key to longevity. Once we hand over the keys to your new space, immediate protection is vital. We recommend placing high-quality felt pads under every piece of furniture before it touches the new finish. It is also important to avoid laying down heavy area rugs for at least 14 days. This allows the finish to fully oxygenate and harden, preventing "ghosting" or permanent shading differences. Because of Middle Tennessee's humidity, we suggest using professional-grade cleaning kits that avoid excessive water, which can damage the wood over time.
Eventually, every floor will show signs of life. To keep your investment looking its best, plan for a "screen and coat" every few years to refresh the top layer of protection before it wears down to the raw wood. This proactive approach saves you from the need for a full sanding later on. If you are ready to begin your home's transformation, schedule your professional installation consultation with McGrath Floor & Design today.
Ready for Your Home's Stunning Transformation?
Your home deserves a foundation that matches its beauty. We've explored how proper acclimation addresses Nashville's unique humidity and why subfloor engineering is vital for a quiet, stable surface. From the first measurement to the final coat of finish, the professional hardwood floor installation process ensures your investment is protected for generations. It's about more than just laying wood; it's about meticulous craftsmanship and local expertise.
With over 50 years of combined experience and a team of NWFA Certified Installers, we're dedicated to bringing your vision to life. We utilize advanced dust-containment technology to keep your home clean and your family comfortable throughout the project. Let us act as your trusted guide in creating a space you'll love coming home to every day.
Book a Professional Installation Quote with McGrath Floor & Design today and take the first step toward a flawless finish. We look forward to helping you build a home that lasts a lifetime.
Frequently Asked Questions
How long does the professional hardwood floor installation process take?
Typically, the timeline ranges from 10 to 21 days for a standard home. This includes the non-negotiable 7-to-10-day acclimation period followed by the actual professional hardwood floor installation process and finishing. Larger projects or those involving intricate custom staining may require additional time. We provide a detailed schedule during your consultation so you can plan your life with confidence.
Do I really need to acclimate my wood floors in Nashville?
Absolute acclimation is vital in Middle Tennessee. Our local humidity levels fluctuate significantly, and wood is a natural material that breathes. Without this step, your planks may expand or contract too quickly once installed, leading to structural failures. We use professional moisture meters to verify the wood has reached equilibrium with your home's specific environment before the first nail is driven.
Can you install solid hardwood over a concrete slab?
You cannot install solid hardwood directly onto a concrete slab. Solid wood requires a wooden subfloor for mechanical fastening. If your home has a concrete foundation, engineered hardwood is the superior choice. It offers the same aesthetic beauty but features a layered construction that handles the moisture and stability requirements of a concrete surface without the risk of buckling.
Is dustless sanding actually 100% dust-free?
While no system is 100% dust-free, our advanced HEPA-filtered containment systems capture approximately 99% of airborne particles. This technology prevents the fine dust from settling in your vents or on your furniture. It is a massive improvement over traditional methods. You might see a trace amount of heavy dust near the baseboards, but the air quality in your home remains remarkably clean.
How long do I have to stay off my floors after they are finished?
You can typically walk on your floors with socks 24 hours after the final coat of a water-based finish. However, you should wait at least 72 hours before moving furniture back into the room. Avoid rugs for at least 14 days to allow the finish to fully oxygenate and harden. Following these timelines ensures the professional hardwood floor installation process results in a finish that lasts a lifetime.
What is the difference between a nail-down and a glue-down installation?
The choice depends entirely on your subfloor type. Nail-down installation is the standard for solid wood on plywood or OSB subfloors, using cleats or staples for a mechanical bond. Glue-down installation uses high-strength adhesives to secure engineered planks directly to concrete slabs. Both methods provide a rock-solid feel underfoot when executed with precision and high-quality materials.
Should I install my floors before or after my kitchen cabinets?
We generally recommend installing hardwood floors before your kitchen cabinets. This allows the wood to run under the appliances and cabinetry, providing a cleaner look and preventing height issues with dishwashers. It also ensures that if you ever remodel your kitchen layout in the future, you won't have holes in your flooring where the old cabinets once stood.
How do I choose between solid and engineered hardwood for my Brentwood home?
Your home's foundation is the deciding factor. Many newer Brentwood developments utilize concrete slabs, making engineered hardwood the ideal choice for its stability and moisture resistance. If you live in a traditional estate with a crawlspace and wooden joists, solid hardwood offers the timeless ability to be refinished multiple times. Our team helps you weigh these technical factors against your long-term design goals.


